
Verification of advanced HI features to support everyday communication: Do’s and Don’ts
Learn which advanced hearing instrument features can (and cannot) be verified in a typical clinical setting, and how to verify them accurately.
You may have read the previous post about the Verification Assistant feature in Phonak Target and how important it is to ensure the hearing instrument (HI) is programmed appropriately when verifying the response against a prescriptive target. In this article, we will look at other verification measures and discuss the correct conditions for accurate results.
When reviewing marketing materials and comparing various HIs, some of us may want to measure a specific response associated with a particular feature and compare it with either a data sheet or a different product.
When attempting such measurements, it is important to consider the following:
- Is my measurement system appropriate for this purpose?
- Is my measurement environment acoustically appropriate for this purpose?
- What is truly feasible to measure?
Measurement system
Measuring advanced features may require specialized capabilities from the measurement system, such as:
- Non-modulated signals (e.g., pink noise)
- Modulated signals (e.g., International Speech Test Signal (ISTS) presented in the range of 50–80 dB SPL)
- Signal analysis tools like Fast Fourier Transform (FFT)
- Additional loudspeakers or channels
Many modern systems can accommodate these requirements. If yours does, you’re in good shape to proceed.
Measurement environment
For the measurement system to work correctly, it must be placed in an appropriate acoustic environment. It is essential to ensure that background noise does not interfere with the measurements. In other words, the lower the stimulus level used, the lower the background noise level must be.
A test chamber can help to block external noise, but if the chamber is placed on a vibrating surface, unwanted noise may still be introduced into the measurement environment.
What is really feasible?
Answering this question requires a good understanding of the feature you’d like to verify, along with the requirements of the measurement system and environment. If the feature’s requirements are met by your system and setup, you can proceed confidently with verification. Please note that attempting to verify an HI feature in inappropriate conditions may lead to misleading results.
Once the prerequisites are in place, the general recommendation is to keep things simple: verify one feature at a time by making two measurements—one with the feature turned off and one with the feature turned on or adjusted to a certain strength. Make sure all other features remain at the same settings.
Most REM software allows you to create measurement presets, making it convenient to set up and save each verification condition. This approach ensures that the same measurement conditions can easily be repeated later.
So, with that in mind, you might ask: Can any features be verified?
The answer is yes, and below you will find an example that can be carried out using most standard equipment configurations.
Verifying SoundRecover2
SoundRecover applies frequency lowering to shift sound into the audible range. In this example, we will demonstrate the effect of various SoundRecover2 settings using the “s” signal, which—along with the “sh” signal—is tailored for this purpose.
Once again, we will make use of the Verification Assistant, as it is also designed for the verification of SoundRecover. The procedure is as follows (please note it is in a Noah environment):
Prepare your equipment:
- Select an “s” or a “sh” stimulus
- Choose a 65 dB stimulus level
Prepare the hearing aid for the first measurement:
- Carry out the initial fitting on the ear or in the test chamber
- Make sure SoundRecover2 is disabled (Fine tuning → SoundRecover2)
- Open the Verification Assistant (Fine tuning → Gain & MPO)
- Follow the steps, including the Verification type and Program options
- Enter the Verification step
- Switch to the verification software and start a measurement
- Now you have the response with SoundRecover2 Off
- Close the Verification Assistant
Measuring SoundRecover2 at various settings:
- Enable SoundRecover2 (Fine tuning → SoundRecover2)
- Open the Verification Assistant again (Fine tuning → Gain & MPO)
- Follow the steps, including the Verification type and Program options
- Enter the Verification step and choose the SoundRecover2 tab
- Click the button “Adjust SoundRecover” – now you can make changes to the SoundRecover2 settings from within the Verification Assistant
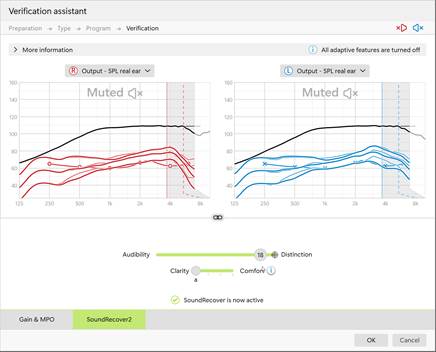
- For each combination of Audibility/Distinction and Clarity/Comfort:
- Set Audibility/Distinction and Clarity/Comfort
- Make a measurement
- Close the Verification Assistant
- Review the results in your verification software
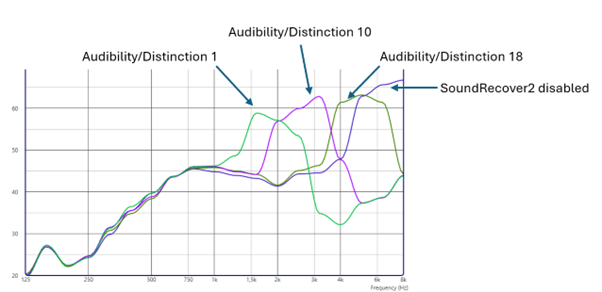
The image below shows the HI responses: one with SoundRecover Off, and three with Audibility/Distinction set to 1, 10, and 18. Depending on the level of detail required, you may consult the SoundRecover2 paper to evaluate whether frequency lowering was applied as intended. As the responses below are specific to the particular fitting, you may see different curves in your setup.
Verification of SoundRecover2 is important to balance audibility and distinction for an optimal fitting. For additional details, refer to the resources below.
Further reading and resources
- Field Study News: Verification of SoundRecover2
Explore this foundational 2016 publication, which remains a key resource for understanding and verifying SoundRecover2 settings. Read the Field Study News.
- Phonak Target User Guides
Access comprehensive instructions on using verification tools within the Phonak Target fitting software, including the Verification Assistant. Access User Guides.